
I’m a big, big fan of the Open Broadcast System (https://www.obsproject.com). It’s open source and incredibly versatile as a screen recording tool. The YouTube video above walks through the rationale I have for using it instead of the Canvas video recorder. It has the affordances of most screen recording software, but it adds a few extra features that make it especially useful as a student feedback tool.
Easy Layout

The layout is pretty straightforward and easy to learn, especially if you’re just learning it.
#1: The video
Simple enough, the main thing you are looking at when OBS is running is the video you’re making. This makes it easy to monitor and make sure everything you think is being recorded is actually being recorded. When I tried recording instructions or walkthroughs in other software, I didn’t realize that context menus (the things that pop-up when you right click or open a menu, like the QuickStyles menu in Word) and dialog boxes (smaller windows where you set options for programs, like the font settings window in Word) weren’t captured. I’d get confused emails from students, wondering what I was talking about with the Word Reference Manager, since they couldn’t see a single thing I was doing.
If you’ve got multiple monitors, it’s great to leave OBS running on the screen you aren’t recording, since you can keep track of the video a little more easily.
#2: Scene setup
“Scenes” are the saved settings for any particular video type you might record. You can see I’ve got a basic “Scene,” two virtual cameras (more on that below), and an “Assignment Feedback” scene, which is currently active in the screenshot. This is useful if you record different types of videos.
When I record feedback for students, I use “Assignment Feedback,” which already has a bunch of Sources (see below) dialed in. When I do a general recording of myself for a weekly announcement, I use “Scene.” And, if I want to do anything special with a Zoom call (like put my name and job title on the slide or share something on my screen without the Screen Share tool), I can use one of the virtual cameras.
Super useful because I don’t have to set this stuff up every time I launch OBS.
#3: Sources
This took me the longest time to figure out. Obviously, the ➕/➖ in the bottom adds or deletes video and audio inputs. The up and down arrows move things in the “stack” of sources, so placing “Camera” above other sources makes sure it stays on top of any other window or video I want to share.
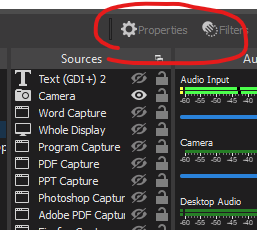
I didn’t label it in the screenshot, but the “Properties” and “Filters” buttons are also where you customize each source. This offers a little finer control over the final video. For instance, my Firefox Capture source (a generic “Window Capture” source in OBS) has the following properties:
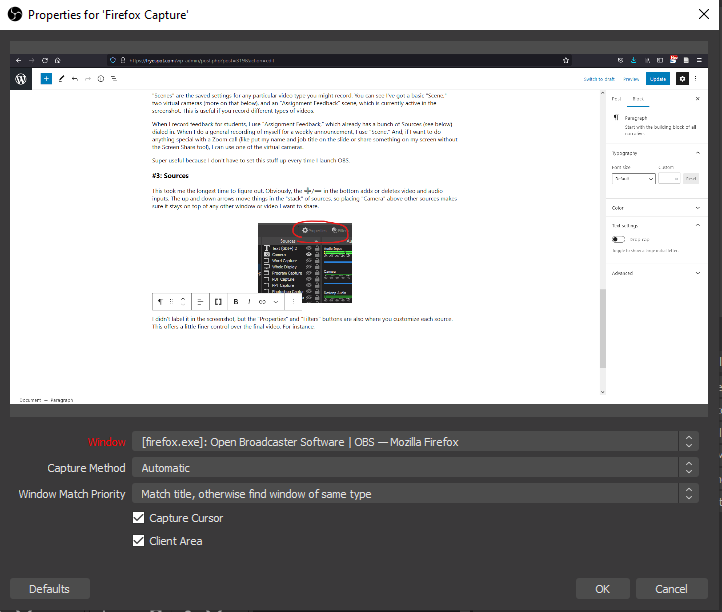
The top panel shows a preview of the video source, while the dropdown menus help fine tune what’s selected. The Window menu selects what window it should be looking for. Importantly, the “Window Match Priority” menu is what makes the Source a little easier: mine is set to find the same title (“Open Broadcaster Software…”). If it can’t, it should look for the same type of window (“Mozilla Firefox”). When I’m giving student feedback, if I don’t want to share my entire screen (which might include other students’ grades, my Facebook feed or other stuff I don’t want to share) and I don’t want to select which window I want to record for each video, this automatic source selection is really useful.
Maybe more importantly, when I’m giving student feedback, I am usually working through a lot of windows. I’ve got their submission open in Canvas (a Firefox window) for the rubric. I’ve got their submission open as a Word document, a Premiere video, a Photoshop document or whatever else. I might have a PowerPoint open from class. It’s far easier to toggle the visibility (eyeball icon in the Sources panel) of each window than try to track each one down as I go.
#4: Audio Mixer
After I figured out how to start a recording (below), this was the second tool I really figured out how to work. Every Source that has audio is listed here, along with your “Desktop Audio”—the sound coming from whatever applications you have open.
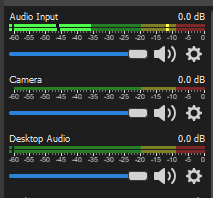
We’ve all had it happen in video conferencing and similar tools: we think we’ve muted ourselves or that we’ve muted the things we don’t want to interfere with us, but we didn’t. Or, we ask people repeatedly, “Can you hear me OK?”
The audio mixer gives two important tools for screen recording, especially in student feedback videos. First, any of those speaker icons can be clicked to mute that source of sound. Really useful if you’re clicking through websites that might have ads with sound!
Second, the mixer tells you how loud various inputs are: the red is too loud, with the audio likely blowing out any words you’re saying; the yellow is about right and I usually set that as my goal volume; the green is quiet, with noise under -25db becoming hard to hear.
Like me, you might have a non-ideal recording environment. (My personal setup involves an air conditioner right behind me, a toddler typically within 8 feet of me, and dogs barking through the window out our cats.) That gear icon opens up the properties and filters panel for that specific input.
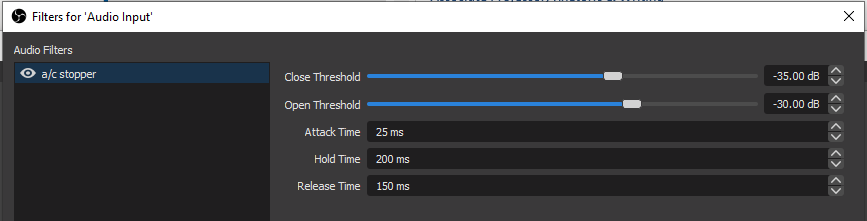
The air conditioner is probably the most noticeable bit of background noise that I have to deal with. It’s a low enough hum that it constantly sounds like I’m in a light windstorm. I don’t want to shout at my microphone to try to drown it out, so I use a “Noise Gate” filter. (You can get the same effect with Noise Supression or a Condenser, but the Noise Gate has the fewest settings to get right.) You can see I’ve got the “Open Threshold” set to -30db, which is just a little quieter than my normal speaking voice when I’m watching those audio levels. So, once my mic picks up a sound louder than -30db, it turns on. It stays on until the noise it’s picking up goes below -35db (the “Close Threshold”).
Scenes!
Remember when I said that Scenes save all of their Source settings? Well, I teach a lot of software classes, which means there is a lot of video time that I spend typing or clicking, which isn’t a great noise to try to talk over at the same time. The air conditioner Noise Gate is useful when I am just recording myself talking, but my announcement video Scene has a few extra filters set up to block keyboard taps and other noises.
#5: Record!
That last panel has the things you need most to get started.
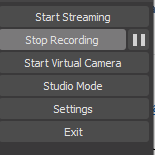
The start/stop recording button does exactly what it says: it records or quits recording (hit that pause button to sneeze). The Virtual Camera is something I’ll do a separate post on: it lets you use whatever is in your OBS recording space (#1) as your camera input for things like Zoom. Very useful if you want to show something on your screen without taking over the Screen Share utility! The Settings menu has all of the really useful nuts and bolts, some of which you’ll want to adjust before you start using the program.
Where am I saving these videos?
Head to Output on the Settings menu.
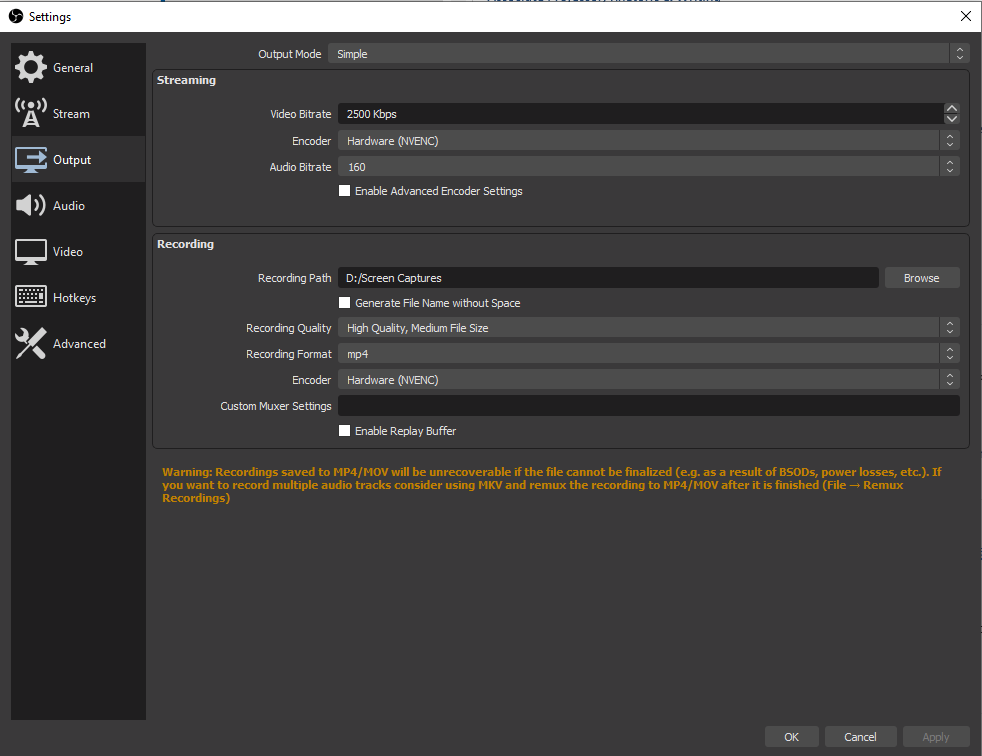
The “Recording Path” is where everything gets saved, and the Recording Format is the file type. (Important, since YouTube and other tools won’t accept mkv files, and other programs won’t accept mov.) If you are worried about file size, reducing your Recording Quality will reduce the video file size.
Too much clicking! Buttons are tiny!
I don’t like the awkward moments where I tell students that I’m looking for the “Stop Recording” button, and if I’ve got to sneeze, hunting down that pause⏸icon is frustrating. The Hotkeys menu will let you set up keyboard and mouse commands to simplify the process.
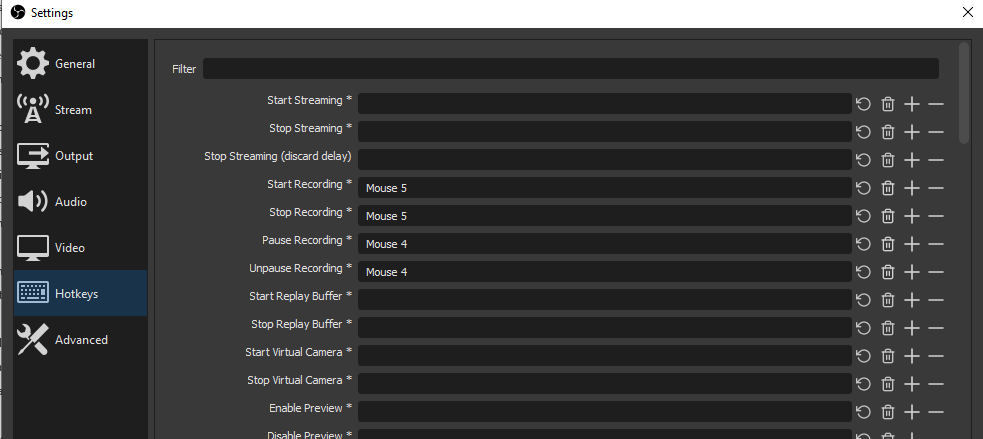
My mouse has a few extra buttons on it, so I can make one of the buttons a start/stop recording button (Mouse 5) and the other (Mouse 4) a pause/unpause button by clicking in that empty line and pressing whatever button or button combination I want to use. (My office computer doesn’t have a fancy mouse, so I’ve set the start/stop record to Ctrl + `.)
Trade Offs?
The setup process takes a while if you do it all in one sitting. But, if you just want to record yourself talking over a window or your whole screen—say, if you’re reviewing a student’s X-ray image they submitted on Canvas and you want to call attention to specific details—OBS is easy to get up and moving. Just set the output destination, add your screen (camera optional) as a source and hit record! All of the extra details here are things I added over time as I felt the need for them.
Writing Teacher Evaluation
Honestly, the thing that makes me use this system for student feedback over anything else is the time. For short written assignments (1-2 page memos), I will give each student 3-5 minutes of feedback. For longer assignments (10 page reports, videos, presentations), I might give 10-15 minutes or more of feedback. That sounds like a lot, especially if I’ve got 40 or so students turning things in.
But, writing and speech teachers know one conversion that helps put this in perspective. The average person reading at a normal talking speed can read a single, double-spaced page of text in about two minutes. So, a three minute feedback video for a short assignment is kind of like me giving back a page and a half of notes. A fifteen minute feedback video is like eight pages of notes.
I can give a lot of feedback in that amount of time or paper. Importantly, it would take far more time to write out the feedback I give verbally, and I’d be missing the visual aspect of highlighting or clicking on things as I went. In all reality, I started doing video feedback shortly after our youngest was born because I did not have the time to do written feedback, especially because she spent most of her life sleeping on my arm or shoulder. Now that she is older and entertaining herself (mostly), I still do video feedback with OBS because I can get feedback to a lot of students in less time than if I wrote it out.
⭐⭐⭐⭐⭐, would download again!
